

Asphalt Shingle Installation — Proper Methods for GAF Timberline Systems
Manufacturer-referenced installation guide covering GAF Timberline HDZ sequence, StrikeZone nailing, starter strip placement, and warranty compliance. From 1 Source Roofing, Atlanta's GAF and CertainTeed certified contractor.
Certified by Industry-Leading Manufacturers
Why Installation Method Determines Roof Performance
A GAF Timberline HDZ shingle sitting in the bundle is not a roof. The shingle itself — fiberglass mat, granule surface, self-sealing adhesive strip — has no performance value until it is installed correctly. The performance numbers that appear in GAF's marketing materials (Class 4 impact resistance, 130 mph wind rating, 130-year limited warranty) are dependent entirely on the installation method. Those numbers are achieved only when the shingles are installed per GAF's published application instructions, using the correct nailing pattern, the correct offset, the correct starter strip, and the correct underlayment system.
This is not boilerplate. GAF's installation instructions for Timberline HDZ run to multiple pages, with specific requirements for nail placement zone, nail count by wind region, starter strip type and placement, offset pattern, hip and ridge installation, and temperature handling. Every one of those requirements exists because deviating from it produces a measurable degradation in roof performance. A nail placed 1 inch above the StrikeZone does not engage the double-layer fastening zone. A starter strip installed with insufficient overhang leaves the eave edge without adhesive coverage. A shingle installed below 40°F without hand-sealing will not seal thermally until the following warm season — and may blow off before it gets the chance.
At 1 Source Roofing, the application instructions referenced in this guide are the same documents our crews work from. The GAF Timberline Series Shingle Installation Detail (SSTS04) and the Timberline Series Application Instructions are field documents, not filing cabinet documents. What follows is a technical walkthrough of the sequence and requirements those documents specify, written for homeowners who want to understand what proper installation actually looks like.
The GAF Timberline HDZ: What Makes It Different
The Timberline HDZ (High Definition Z) is GAF's current flagship residential shingle and one of the most specified products in the Atlanta market. It is a laminated architectural shingle — two layers of fiberglass mat bonded together with an asphalt compound — producing the dimensional, shadow-line appearance that distinguishes architectural shingles from three-tab products. The HDZ designation indicates that this version includes LayerLock technology, which is the feature that most directly affects installation requirements.
LayerLock is GAF's term for the fastening geometry built into the Timberline HDZ shingle. The shingle's profile is designed so that when the StrikeZone nail is driven correctly, it passes through the top shingle's nailing zone and simultaneously through the nailing hem of the shingle below it. Two shingles are captured by a single nail — and the geometry ensures this happens at the correct location every time. This double-layer capture is what produces the Class F (130 mph) wind resistance rating. It requires no special technique beyond placing the nail within the 1.5-inch StrikeZone. But it requires exactly that — nails in the zone, not above it, not below it.
Starter Strip Placement — The Foundation of Every Course
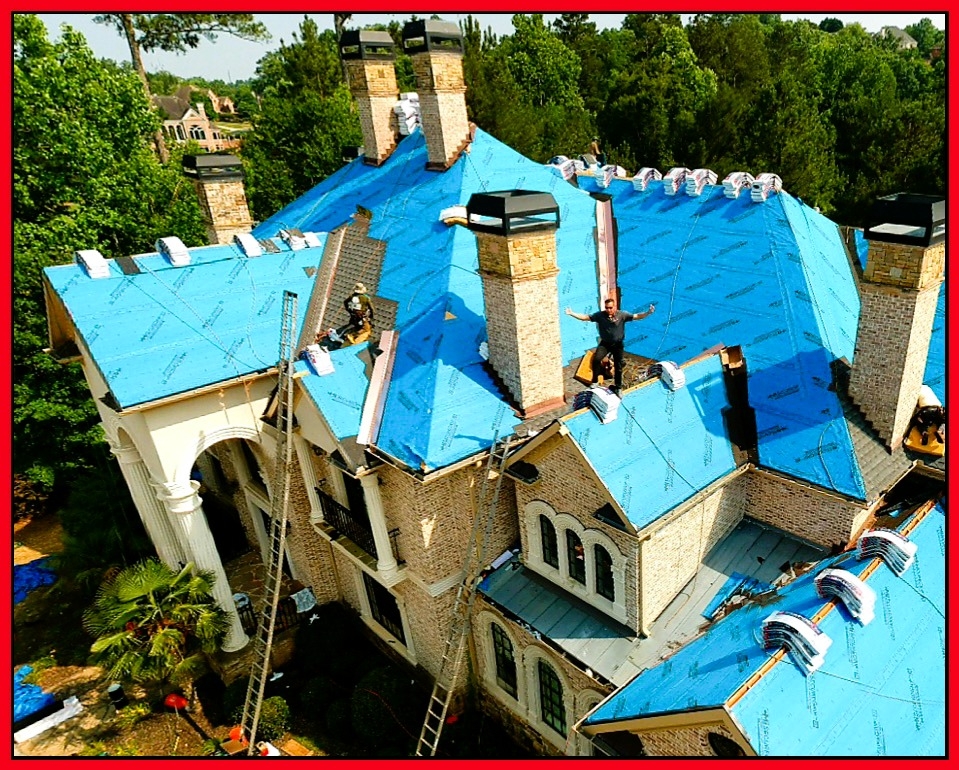
The starter strip is the first material installed on the roof deck after the underlayment, and it is one of the most installation-critical components on the entire roof. Its function is to provide adhesive coverage at the eave edge and rake edges — the locations that experience the highest wind uplift forces and the most direct exposure to driven rain. Every field shingle on the roof is eventually protected by the shingle above it. The first course of field shingles has nothing above it except air. The starter strip is what covers the gaps between the first-course field shingles and adheres the leading edge of those shingles to the roof deck.
GAF Pro-Start and WeatherBlocker Starter Strips
GAF produces two starter strip products designed for use with Timberline systems: Pro-Start and WeatherBlocker. For standard installations, Pro-Start provides a full-width adhesive strip at the correct position for the first course of Timberline HDZ shingles. WeatherBlocker is a wider product for eaves and rakes in high-wind applications, providing a wider adhesive band for greater wind resistance at the perimeter. Both products are required components under GAF's System Plus and Silver Pledge warranty tiers — the warranty is conditioned on using GAF-approved components, and cutting corners with a field-fabricated starter (made by flipping regular shingles upside down and trimming the tabs) does not meet this requirement.
The starter strip must be positioned so that its adhesive strip falls along the eave edge directly over the lower portion of the first-course field shingles. Specifically, the back edge of the starter strip should be flush with or slightly overhanging the drip edge — typically 1/4 to 3/8 inch of overhang into the gutter. This overhang dimension matters: too little overhang leaves the drip edge exposed and allows water to drip behind it; too much overhang creates a floppy shingle edge that can crack or blow up in high wind. GAF's installation detail specifies a 1/4 inch to 3/8 inch overhang at both eaves and rakes.
Starter Strip at the Rake
The eave starter strip is well understood by most contractors. The rake starter strip is frequently skipped. GAF's instructions require a starter strip along both eaves and both rakes on every Timberline installation. The rake starter provides adhesive coverage under the rake edge of each field shingle course — without it, every shingle edge at the rake is adhered only to the shingle below it through the self-sealing strip, which runs parallel to the eave, not perpendicular to the rake. The rake edge is exposed to wind-driven lateral loads that the field-shingle adhesive strip is not oriented to resist. The rake starter strip is the component that fills this gap.
In practice, missing the rake starter is one of the most common installation shortcuts in the Atlanta market. A roof without rake starters is not installed per GAF's published specifications, and any wind damage at the rake edge is not covered under the limited warranty because the installation was non-compliant from the start.
The Installation Sequence: From Eave to Ridge
Shingle installation proceeds from the eave upward to the ridge in a specific sequence. The order is not arbitrary — it follows the direction of water flow, so each course of shingles is lapped by the course above it, creating a continuous waterproofing system that sheds water down the slope and into the gutter. Deviation from the eave-to-ridge sequence creates opportunities for reverse laps, where an upper course ends up under a lower course and water is directed into rather than away from the roof deck.
Course 1: The Starter and First Field Course
The starter strip is installed first along the eave, followed immediately by the first course of field shingles. The first field shingle course is installed with zero offset — the rake edge of the first shingle is aligned with the rake edge of the roof. The bottom edge of the first field shingle should overhang the starter strip and drip edge by 1/4 to 3/8 inch, matching the starter strip overhang. The first course sets the horizontal alignment for every course above it, so level installation of the first course is essential. Any level error in course 1 compounds through every subsequent course.
Offset Pattern: The 6-Inch Rack
Timberline HDZ shingles are installed using GAF's recommended 6-inch offset pattern. Each successive course is started 6 inches to the right (or left, depending on the starting direction) of the course below it. Over six courses, the starting point shifts by 6 inches per course, then resets. This creates the staggered vertical joint pattern visible on any properly installed architectural shingle roof.
The offset pattern serves a functional purpose beyond aesthetics. Vertical joints between adjacent shingles in the same course are gaps — locations where two shingles butt against each other with only a thin bead of adhesive and the shingles below providing coverage. If these joints were aligned vertically across multiple courses, they would create a continuous low-resistance path for water infiltration. The 6-inch offset ensures that no two courses have joints in the same horizontal position, so every joint has full shingle coverage from the course above it.
A common error is using an insufficient offset — 4 inches or less — which creates a "stair step" pattern where joints from different courses align too closely. GAF's application instructions specify a minimum 6-inch offset for Timberline HDZ to prevent this condition. Some contractors use a random offset, which is permissible as long as no two adjacent courses have joints within 6 inches of each other horizontally.
Headlap and Exposure
Exposure is the dimension of each shingle that is visible — the amount not covered by the course above it. For Timberline HDZ, the designed exposure is 5-5/8 inches (5.625 inches). This dimension is locked in by the shingle's geometry: the shingle is 13-1/4 inches tall, and with a 5-5/8 inch exposure, the headlap — the amount of overlap between the top of the shingle below and the bottom of the shingle two courses above — is 2 inches. Two inches of headlap is the minimum required to ensure that water cannot penetrate through the joint between adjacent shingles in the same course and reach the roof deck.
Increasing the exposure reduces headlap. A contractor who sets shingles at 6 inches of exposure instead of 5-5/8 inches has reduced the headlap from 2 inches to 1-1/4 inches — a 37 percent reduction in the waterproofing overlap. This may seem like a small deviation, but wind-driven rain entering at an eave can travel several feet up a slope under sufficient pressure. The 2-inch headlap is designed around a specific water pressure threshold. Reducing it below that threshold compromises the waterproofing integrity of the entire field.
StrikeZone Nailing — Placement, Count, and High-Wind Requirements
Nailing is the most technically specific requirement in the Timberline HDZ application instructions, and it is the requirement most directly tied to wind resistance performance. The GAF SSTS04 installation detail identifies the StrikeZone nailing area by dimension and position on the shingle, specifies the nail count for standard and high-wind conditions, and addresses fastener type and length requirements. Every deviation from these specifications reduces wind resistance in a measurable way.
The StrikeZone: Where the Nail Must Go
The StrikeZone is a 1.5-inch-wide band printed on the back of every Timberline HDZ shingle, positioned just above the upper edge of the self-sealing adhesive strip. When a nail is driven within this zone, it penetrates two layers of shingle material simultaneously: the nailing hem of the shingle being installed, and the upper portion of the nailing hem of the shingle course below it. This double-layer capture is the mechanical basis for LayerLock technology — it is not achieved through adhesive alone, but through the geometry of the nail placement engaging two shingle layers at the same time.
Placing a nail 1 inch above the StrikeZone — into the body of the shingle rather than the nailing zone — misses the double-layer engagement. The nail holds the top shingle to the deck but does not capture the shingle below. The top shingle is held at one layer rather than two, with significantly reduced resistance to uplift. Placing a nail below the StrikeZone — through the exposed portion of the shingle — drives a hole through the weather surface without providing any fastening benefit and creates a potential water entry point.
Four-Nail vs. Six-Nail Installation
Standard Timberline HDZ installation requires 4 nails per shingle: two nails in the left half of the shingle and two nails in the right half, all within the StrikeZone. The nails should be placed approximately 1 inch from each end of the shingle, with the remaining two nails positioned between them at roughly equal spacing.
Six-nail installation is required in the following conditions:
- Wind zones with design wind speeds of 90 mph or greater — which includes most of metro Atlanta under the current building code
- Within 4 feet of rakes, eaves, and ridges on any installation, regardless of wind zone
- When GAF System Plus, Silver Pledge, or Golden Pledge wind warranty coverage is requested
- When local building codes require enhanced fastening
The sixth nail in the six-nail pattern is placed in the center of the shingle, within the StrikeZone. This central nail addresses the tendency of large architectural shingles to flex or lift at the center point between the end nails. Under high-wind conditions, this center lifting is where seal failure begins — the adhesive strip lifts at the midpoint before the end nails fail. The center nail eliminates this failure mode.
For virtually all 1 Source Roofing installations in the Atlanta area, six-nail installation is standard. The additional cost is two nails per shingle — less than a cent per shingle in material. The benefit is full compliance with GAF's wind warranty requirements and actual improved wind resistance in a market that sees regular severe weather events.
Nail Type and Length
GAF specifies corrosion-resistant roofing nails with a minimum 3/8-inch diameter head (to prevent pull-through) and a minimum shank length sufficient to penetrate the roof deck by at least 3/4 inch. For standard 7/16-inch OSB or 1/2-inch plywood decks, a 1-1/4 inch roofing nail is the minimum; for thicker decks, longer nails are required. Hot-dipped galvanized or stainless steel nails are specified — electro-galvanized nails are not acceptable because the thinner coating corrodes in the high-humidity conditions present in an attic space.
Staples are not acceptable fasteners for Timberline HDZ shingles under any GAF warranty tier. This prohibition is absolute and applies regardless of staple gauge or crown width. GAF's testing has established that staples do not provide equivalent uplift resistance to nails, and staples are more prone to driving at angles that reduce holding power. A stapled roof is a non-compliant roof under every GAF warranty program.
Is Your Roof Installed to GAF Specifications?
Improper nailing, missing starter strips, and incorrect exposure are invisible once the roof is complete. 1 Source Roofing documents every installation step with photo verification before the next course is installed.
Schedule Your Free InspectionHip and Ridge Cap — The Final Seal at the Roof Peak
The ridge cap is the last component installed and the one that completes the weather seal at every peak and hip. It covers the gap where two opposing roof planes meet — a gap that, if left exposed, would be the largest single water and air infiltration point on the roof. Ridge cap installation sequence, nailing, and product selection directly affect the long-term performance of the installation.
GAF Seal-A-Ridge and TimberTex
For Timberline HDZ installations under System Plus, Silver Pledge, or Golden Pledge warranty programs, GAF requires GAF-manufactured ridge cap shingles — Seal-A-Ridge for standard applications and TimberTex for premium dimensional ridge applications. Both products are designed with pre-cut bend lines that allow them to fold cleanly over the ridge or hip angle without cracking or distorting, regardless of the pitch. Third-party ridge caps, or field-fabricated hip and ridge pieces cut from field shingles, do not meet GAF's warranty requirements and do not match the Timberline HDZ granule blend for color consistency.
Ridge cap shingles are installed beginning at the opposite end from the prevailing wind direction — typically the northeast end of the ridge on Atlanta roofs — so that each successive piece laps over the preceding one, with the lap facing away from the prevailing wind. This sequencing prevents wind from getting under the lap edges. The nails are placed just above the adhesive strip on each ridge cap piece, at the correct position to be covered by the next piece — so no nail heads are exposed to weather on a completed ridge.
Hip Installation Sequence
Hips are installed from the eave up to the ridge, beginning with a starter piece at the eave. The hip starter should align with the eave drip edge overhang, matching the field shingle overhang of 1/4 to 3/8 inch. Each successive hip cap piece is lapped over the piece below it at the correct exposure — typically 5 inches of exposure for standard hip and ridge products. The hip cap meets the ridge cap at the roof peak, where the last ridge cap piece is installed over the hip cap intersections to complete the seal.
For more detail on hip, ridge, and starter shingle installation, including the interaction between starter strips and the first hip cap course, see the companion guide: Hip, Ridge, and Starter Shingle Installation Standards.
Georgia Climate Considerations for Shingle Installation
Metro Atlanta's climate presents specific installation conditions that differ from the northern markets where many installation standards were originally developed. The relevant factors are summer heat, winter cold, and the humidity that characterizes Georgia throughout the year. Each affects shingle handling, adhesive performance, and the correct installation practices for the conditions.
Summer Installation: Managing Heat and Adhesive Activation
In July and August, roof deck surface temperatures in metro Atlanta regularly exceed 150°F and can approach 160°F to 170°F on south-facing slopes in full sun. At these temperatures, asphalt shingles are pliable. They can be bent, creased, and distorted by rough handling or foot traffic. A shingle that is creased during installation will not lie flat — the crease creates a ridge that concentrates water runoff, lifts the shingle edge above the adhesive strip contact, and is visible from the street. Proper summer installation requires handling shingles from the bundles directly to the course being installed, minimizing foot contact with laid shingles, and staging material in shaded areas or under tarps when possible.
The self-sealing adhesive strip activates thermally — it softens in heat and bonds to the shingle above it as the roof cools and the adhesive re-hardens with the two surfaces in contact. In summer conditions, this activation happens quickly — often within hours of installation. This is generally beneficial for wind resistance, but it means that a shingle placed incorrectly cannot be easily repositioned once the adhesive has engaged. Pulling up a shingle that has thermally bonded tears the adhesive strip and compromises the seal. Summer installation requires accuracy on the first placement.
Winter Installation: Temperature Thresholds and Hand-Sealing
The self-sealing adhesive strip on Timberline HDZ shingles does not activate thermally below approximately 40°F. Below this temperature, the adhesive remains hard and does not bond to the shingle surface above it. A roof installed in cold conditions will have all the field shingles correctly nailed but without adhesive bond — the nails are the only thing holding the shingles against wind uplift until the roof warms sufficiently to activate the adhesive strip. In metro Atlanta, this condition occurs most commonly in December through February.
GAF's application instructions address this directly: below 40°F, each shingle must be hand-sealed with a spot of asphalt roofing cement approximately 1 inch in diameter applied beneath each shingle tab in the location where the adhesive strip would normally bond. This hand-sealing provides immediate bond regardless of temperature. It adds labor time — hand-sealing every shingle on a large roof is not fast — but it is the specified practice and the only way to ensure the roof has wind resistance from the day it is completed rather than waiting for spring temperatures.
Shingles themselves become brittle below 40°F. Cold shingles can crack or break when bent, particularly at hip and ridge applications where the shingle must flex over the peak angle. Hip and ridge shingles should be warmed before installation in cold weather — stored inside overnight or in a heated vehicle, then installed immediately before they cool. A cracked ridge cap is a water entry point and an aesthetic defect that requires replacement.
Humidity and Deck Preparation
Georgia's year-round humidity means that roof decks can absorb moisture between the time the old roof is removed and the new one is installed. In a one-day replacement, this exposure is minimal. But on multi-day projects, or on projects where rain intervenes after tear-off, the deck can gain measurable moisture content. Wet OSB expands, creating surface irregularities that affect shingle lay. Installing shingles over a wet or swollen deck produces a wavy appearance that does not resolve as the deck dries — the shingles have already taken the set of the irregular surface.
The correct practice is to allow the deck to dry fully before installation proceeds, and to replace any OSB panels that have delaminated or buckled due to moisture exposure. At 1 Source Roofing, this means covering stripped decks with tarps during any rain event and drying the surface before starting or resuming installation — even when schedule pressure exists.
GAF Warranty Implications of Improper Installation
GAF's limited warranty for Timberline HDZ is one of the strongest in the residential roofing industry — but it is explicitly conditioned on installation per GAF's published application instructions. The warranty document identifies specific installation requirements that, if not met, give GAF grounds to deny warranty claims. Understanding these conditions is not just technical knowledge — it is the difference between a warranty that functions as described and one that provides less protection than the homeowner expected.
What the Warranty Covers and What It Does Not
The System Plus warranty (available through any GAF-certified contractor) covers manufacturing defects and provides a prorated wind warranty up to 130 mph when installed with 6 nails per shingle within the StrikeZone. The Silver Pledge warranty adds coverage for workmanship defects for a limited period, requiring that the installation use GAF-approved components including GAF starter strips, GAF underlayment, and GAF ridge cap. The Golden Pledge warranty — the highest level — adds a non-prorated wind warranty and extends workmanship coverage to 25 years, but requires installation by a GAF Master Elite contractor and an independent GAF inspection of the completed installation.
The warranty does not cover damage resulting from installation errors. If a roof develops leaks because the starter strip was not installed at the rakes, the warranty does not cover the repair — because the installation was non-compliant. If shingles blow off because the nailing was above the StrikeZone, the warranty does not cover replacement — because the wind resistance specification was not achieved. The warranty covers the product performing as designed when installed correctly. It does not cover the consequences of installing it incorrectly.
Documentation and the 1 Source Verification Process
Because the warranty is tied to installation compliance, 1 Source Roofing documents installation at each critical step: starter strip placement, first-course alignment, nailing pattern before each course is covered, and ridge cap installation. This documentation serves two purposes. First, it creates a record that demonstrates compliance with GAF's requirements — useful if a warranty claim is ever filed. Second, it provides our project supervisors with a verification mechanism at each stage, so installation errors are caught before they are covered by the next course of shingles rather than discovered years later during a leak investigation.
For homes qualifying for GAF Golden Pledge coverage, GAF's independent inspector reviews this documentation as part of the inspection process. The inspector does not strip off courses to verify nailing — the documentation record is how compliance is established after the fact. A contractor who does not document as they go has no way to demonstrate compliance retroactively.
To verify that your existing roof was installed per GAF specifications, or to discuss a replacement that includes full warranty documentation, call (404) 277-1377. We inspect existing roofs at no charge throughout metro Atlanta. See also our GAF Certified Contractor page for details on what certification requires and what it means for your installation.
How 1 Source Roofing Follows Manufacturer Specifications
Following manufacturer specifications is not a differentiator at 1 Source Roofing. It is the baseline. The technical requirements described in this guide — StrikeZone nailing, six-nail installation, proper starter strip placement at both eaves and rakes, correct exposure, temperature-appropriate adhesive handling — are standard practice on every job, not premium options available at upcharge. The reason is straightforward: these specifications are what produce a roof that performs as expected. Deviating from them produces a roof that may look correct but performs below specification, often in ways that are not discovered until the first major storm.
Field Supervision and Quality Control
Every 1 Source Roofing installation is supervised by a project lead who is responsible for compliance with GAF's application instructions on that specific job. The project lead performs course checks at regular intervals — verifying nailing position, offset measurement, and exposure dimension before the next course of shingles covers the previous one. This is not a paperwork exercise. It is a physical inspection of nail placement with a visual check that every nail head is within the StrikeZone and driven flush, not overdriven (which can damage the mat) and not underdriven (which creates a high nail head that lifts the course above it).
For the nail depth issue specifically: a pneumatic nail gun driving at incorrect pressure will either overdrive nails — punching through the shingle mat and reducing holding power — or underdrive them, leaving raised nail heads that create a bump under the overlying shingle course. Both conditions are visible during a course check and corrected before the next course is installed. Correcting nail depth after the overlying course is installed requires removing that course — a significant rework that our inspection process is designed to prevent.
GAF Technical Bulletins as Field Documents
The GAF Timberline Series Shingle Installation Detail (SSTS04) and Timberline Series Application Instructions are referenced during every Timberline HDZ installation. For new crew members, reviewing these documents is part of job-site orientation. For experienced crews, they are the reference document when any installation question arises — not a secondary source to be consulted only when problems occur. When GAF updates its application instructions, we update our practices to match.
This approach is partly why 1 Source Roofing maintains GAF certification. GAF's certification program requires that certified contractors follow published installation standards. It also requires ongoing training and, at the Master Elite level, demonstrated track record of installations that meet GAF's quality standards. Our GAF certification is not a marketing credential — it is a commitment to installation practices that the certification requires.
For related installation topics, see our guides on Shingle Nailing Installation Techniques, the full Roof Replacement process, and the Hip, Ridge, and Starter Shingle Installation Standards that complete the Timberline HDZ system.
Frequently Asked Questions About Shingle Installation
Answers to the questions homeowners ask most about GAF Timberline installation requirements and warranty compliance
What is the GAF Timberline HDZ StrikeZone nailing area?
The StrikeZone is a 1.5-inch-wide nailing zone printed on the back of every GAF Timberline HDZ shingle. It is positioned just above the tar strip, spanning the full width of the shingle. Nails placed within this zone drive through both the top shingle and the nailing hem of the shingle below it — creating a two-layer fastening that dramatically increases wind resistance and activates GAF's LayerLock technology. Nails placed above or below this zone miss the double-layer region, reducing wind resistance and potentially voiding the warranty.
How many nails does a GAF Timberline HDZ shingle require?
Standard installation requires 4 nails per shingle, all placed within the StrikeZone. In high-wind zones (90 mph or greater design wind speed) — which includes most of metro Atlanta — GAF requires 6 nails per shingle for maximum warranty coverage. Six-nail installation must also be used within 4 feet of rakes, eaves, and ridges on any installation. At 1 Source Roofing, six-nail installation is standard practice on all Atlanta-area projects.
What is the correct shingle exposure for GAF Timberline HDZ?
GAF Timberline HDZ shingles are designed for a 5-5/8 inch (5.625 inch) exposure. This dimension is pre-engineered into the shingle's geometry. Installing at a greater exposure reduces the headlap — the critical waterproofing overlap — below the minimum 2-inch requirement. Reducing headlap compromises the roof's ability to resist wind-driven rain and voids the manufacturer's installation specification.
Does heat affect shingle installation in Georgia?
Yes. Roof deck temperatures in metro Atlanta can exceed 150–160°F in summer. At these temperatures, shingles are pliable and can be distorted by foot traffic. The self-sealing adhesive activates quickly, meaning misplaced shingles cannot be repositioned without tearing the adhesive strip. In winter below 40°F, the adhesive strip does not seal thermally — hand-sealing with roofing cement is required on each shingle tab to achieve wind resistance before warm temperatures return.
What happens to a GAF warranty if shingles are not installed per specifications?
GAF's warranty — including System Plus, Silver Pledge, and Golden Pledge levels — is conditioned on installation per GAF's published application instructions. Deviations such as incorrect nail placement, wrong nail count, improper starter strip installation, incorrect exposure, or use of non-GAF components give GAF grounds to deny warranty claims. Under the Golden Pledge warranty, a GAF-certified inspector verifies installation compliance, and non-compliant installations require correction at the contractor's expense.
Technical Bulletins from GAF and CertainTeed
The information on this page is backed by official manufacturer technical bulletins. These documents provide the installation specifications, warranty requirements, and best practices that certified contractors like 1 Source Roofing follow on every project.